


New User Guide (App & Web)
Clicking on the images will open them in another tab
Sign up: Once you have downloaded the CCW Guardian app from your app store:
- Select ‘App Login’
- Select ‘Not a Member’
- Fill in the necessary information (only first and last name, e-mail and password)
IF you already have an account you can simply login (your login information is the same for the App and the Website)
Settings:
Within Settings you are able to activate your membership, enter and edit personal information such as name, address and phone number (This information is required to be eligible for the free giveaways). Within the settings you will also find links to our supporters and you are able to turn on/off Sound, Facebook share pop-up, Sync Reminder pop-up, Sync Web/App and you can also log out from here as well. To access your settings follow these steps.
- Press down on the white icon at the bottom of your screen and slide up (you can rotate this right or left once you drag it up)
- Tap the settings icon (gears)
Adding a Handgun:
- Press down on the white icon at the bottom of your screen and slide up (you can rotate this to the right or left once you drag it up)
- Tap the handgun icon (it may say ‘HANDGUN’ instead of having a picture)
- Select whether you would like to add a CCW or PDW and tap ‘ADD CCW(or PDW)’ located at the top
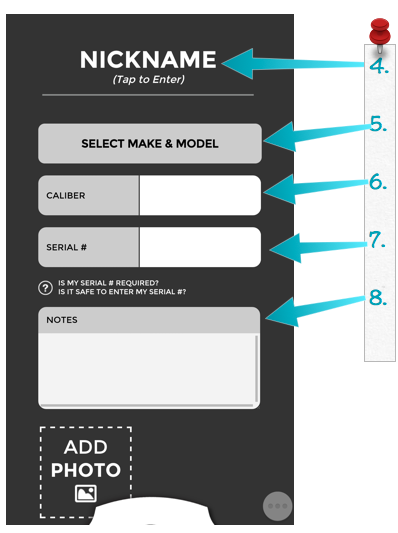
- Tap ‘Nickname’ located at the top of the screen to add a nickname for this handgun
- After that select the Make and Model from the drop down menu provided
- Do the same thing for the caliber (for PDW you will manually enter your caliber)
- Enter the serial # by pressing in the white box located to the right of ‘Serial #’
- Tap in the white area of the ‘Notes’ box to enter any notes on that handgun
Adding a photo:
- Tap the ‘Add Photo’ icon and choose to either take a photo with your device or choose a photo from your device’s library.
- Tap ‘Save Handgun’ and you are done!
Adding a Permit:
- Press down on the white icon at the bottom of your screen and slide up (you can rotate this to the right or left once you drag it up) Tap the permit icon
- Tap ‘Add Permit’ located at the top of the screen
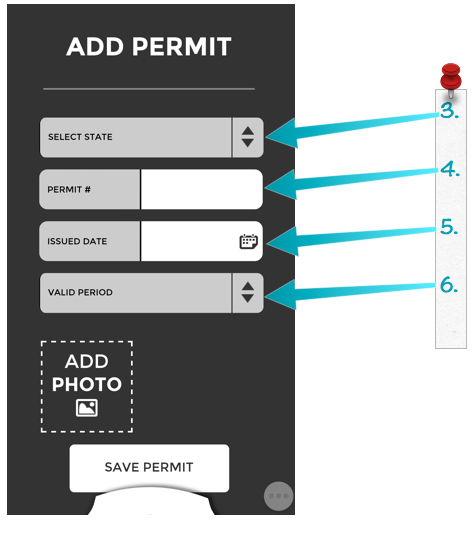
- Tap the appropriate state using the drop down menu
- Enter your permit number
- Tap in the white box next to ‘Issued Date’ to use the calendar to select the date
- Similarly use the drop down provided to select the ‘Valid Period’ (To set a specific date select ‘Set Specific Expiration Date’ located towards the bottom of that drop down menu. Next enter the ‘Period End’ in the box that appears after making this selection)
Adding a photo:
- Tap the ‘Add Photo’ icon and choose to either take a photo with your device or choose a photo from your device’s library.
- Tap ‘Save Permit’ and you are done!
Adding a Log: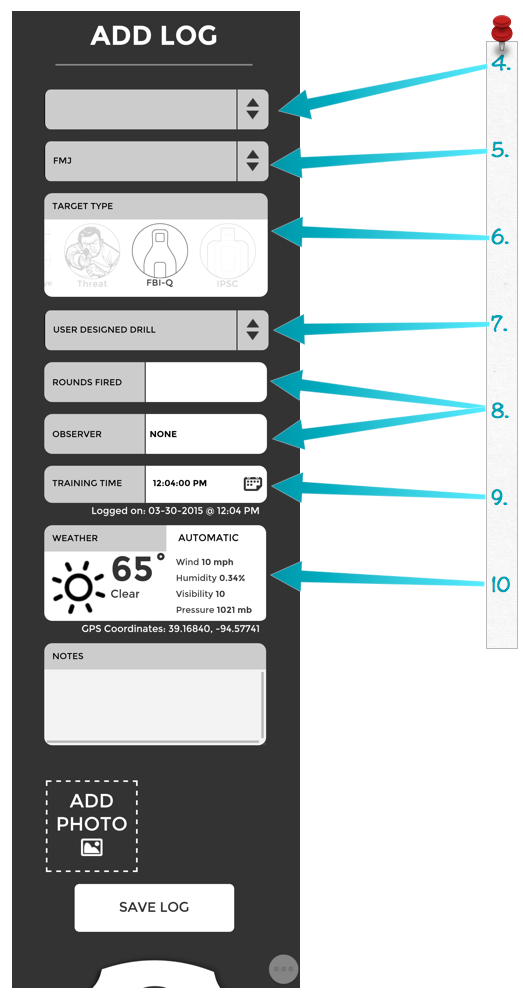
- Press down on the white icon at the bottom of your screen and slide up (you can rotate this to the right or left once you drag it up)
- Tap the Logs icon (looks like a target with a red bullseye)
- Tap “Add Log”
- Select the handgun used for this training from the drop down menu provided (You must have entered your firearms in first)
- In the next box select the ammo type from the drop down menu
- Scrolling left or right in the ‘Target Type’ field, select your target type (If the target you used is not listed select ‘Other’ and enter the target information in the ‘Notes’ section provided below)
- Next choose your training focus by tapping the arrows located directly to the right of the ‘Training Focus’ box (You can also scroll down and select ‘Other’ to enter in a custom training focus)
- Rounds fired and any observers present can be entered in by tapping in the appropriate white box and entering in the necessary information
- Date and Time are entered by tapping in the appropriate white box and then using either the calendar or clock to select the correct date or time
- Weather automatically updates (To manually select the weather simply press ‘Automatic’ located directly to the right of ‘Weather’ then click the arrows to open a drop down menu and selecting the appropriate weather type)
Adding a photo:
- Tap the ‘Add Photo’ icon and choose to either take a photo with your device or choose a photo from your device’s library.
- Tap ‘Add Log’’ and you are done!
Providing Feedback:
We absolutely love it when our users provide us with feedback and suggestions for the app and this is also a great place to report any bugs you may encounter or to simply ask a question. To do that just follow these steps.
- Press down on the white icon at the bottom of your screen and slide up (you can rotate this right or left once you drag it up)
- Tap the feedback icon (envelope)
- Enter in your question, suggestion or feedback
- Tap ‘Send’
Web Guide
Sign up:
- Go to www.ccwguardian.com and click ‘App Login’
- Click ‘Not A Member’
- Fill in the necessary information
- Click ‘Sign Up’
IF you already have an account you can simply login (your login information is the same for the App and the Website)
Settings:
- Hold your cursor over ‘More’ located on the top right of the screen next to the gear
- Clicking on ‘Settings’ will allow you to set and save your time zone
- Clicking on ‘Account’ will allow you to enter and/or edit account details including your Name, E-mail, Phone #, Address and this is also where you change your password.
- While in the Account area you can click on ‘Become a Protected Member’ to activate your membership (this can also be done by selecting ‘Activate Membership’ in the ‘More’ drop down menu)
Adding a Handgun:
- Click on ‘Handgun’ located at the top of the page between ‘Log’ and ‘Permits’

- Click ‘Add Handgun’ and choose if you want to enter your CCW or PDW
- You can enter a nickname by clicking ‘Nickname’ and typing the desired name
- Click to two arrows located directly to the right of ‘Handgun Make’ then using the drop down menu select the make of your handgun
- You will do the same thing to select your Caliber (To enter a custom caliber select ‘Other’ at the bottom of that drop down menu and then type your caliber)
- Click in the white box next to ‘Serial #’ to enter the serial #
- Notes can be entered by clicking in the white box below ‘Notes’ and typing

Adding a photo:
Photos can be added by dragging them into the dotted box provided or by clicking inside the dotted box, selecting the desired image and clicking open in the bottom right corner
- Click ‘Add Handgun’
Adding a Permit:
- Click ‘Permit’ located at the top of the page directly to the right of ‘Handguns’

- Click ‘Add Permit’
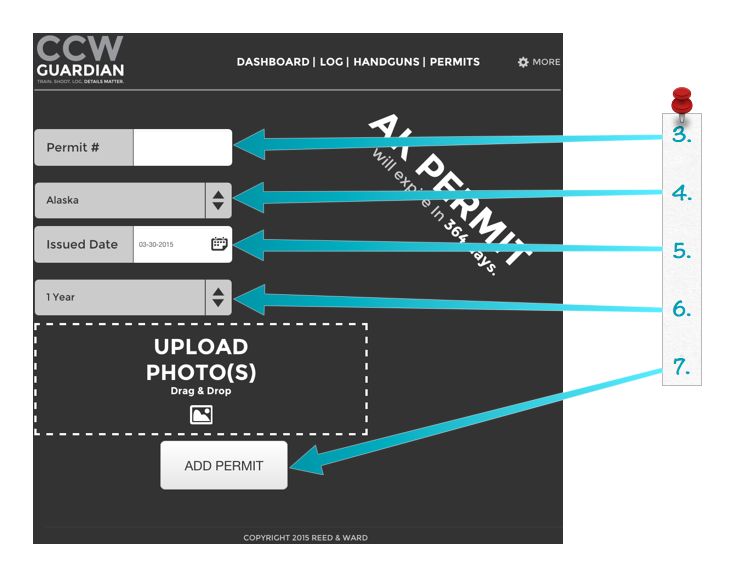
- Click in the white box next to ‘Permit #’ and enter your permit #
- Click the two arrows in the State box and select the state your permit was issued in with the drop down menu
- Click in the white box next to ‘Issue Date’ and use the calendar provided to select the appropriate date
- Click the two arrows next to valid period box to select the appropriate valid period for your permit (To set a specific date select ‘Set Specific Expiration Date’ located towards the bottom of that drop down menu. Next click in the white box next to ‘Period End’ and use the calendar provided to select the appropriate date)
- Click ‘Add Permit’
Adding a Log:
- Click ‘Log’ located at the top of the page between ‘Dashboard’ and ‘Handguns’
- Click ‘Add Log’
- Click the arrows next to ‘Select Handgun’ and use the drop down menu to select your handgun (You must have already entered your handguns in first)
- Click the arrows next to ‘Ammo Type’ and use the drop down menu to select your ammo type (If you select ‘Other’ located at the bottom of the drop down you can enter in a custom ammo type)
- Select your target type by clicking on the appropriate target in the long white box below ‘Ammo Type’ (To access more targets click and hold down your mouse button anywhere inside the white box and drag your mouse to the left or right). If your target is not listed select ‘Other’ located on the far right of that white box and then enter your target’s information in the ‘Notes’ section provided at the bottom of the page
- Click the arrows next to ‘Training Focus’ and use the drop down to select your training focus (You can scroll to the bottom of that drop down menu and select ‘Other’ to enter in a custom training focus)
- Rounds Fired and any Observers present and be entered by clicking in the appropriate white box
- Enter the Date by clicking in the white box next to ‘Training Date’ and selecting the appropriate date
- Weather is automatically updated if your location is found (You can manually select the weather by clicking on ‘Automatic’ located directly to the right of ‘Weather’ and then using the drop down provided to select the weather)
Adding a photo:
Photos can be added by dragging them into the dotted box provided or by clicking inside the dotted box, selecting the desired image and clicking open in the bottom right corner
- Click ‘Add Log’