


TRANSCRIPT
Hello again. I’m David Reed with Reed and Ward, the makers of CCW Guardian, the premier smartphone app for CCW permit holders. This is a field strip disassembly and reassembly video of the Kel-Tec 3AT.
Now, let’s take a look at the box and you can see it’s a Kel-Tec box. I apologize, the distributor put a big nasty label over the top. But this is a small compact polymer box for small compact polymer weapon. Let’s take a look at what’s inside. Now you can lock this box up with either a padlock or a tie, but you know anybody with a screwdriver could force their way into it. So, it’s only a passive safety. The box comes with, first of all, the weapon. It comes with a well illustrated color owners manual which I found to be extremely helpful. If you ever lose this, Kel-Tec will send you another one for free. It also has a trigger lock assembly which comes in this little plastic bag with instructions on how to put it on. This one only came with one magazine and it does not, this particular version, did not come with a piece of brass in a sealed envelope. So, good for it. All right, let’s set that aside.
Let’s clear lock and show safe, this weapon. Magazine out. Lock it to the rear. I can visually inspect the chamber. Now I’m going to lock it up like this, by making a lever with my hand and physically inspect the chamber. Good! The weapon is safe and clear. This is the Kel-Tec 3AT.
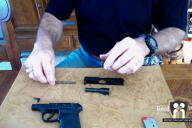
Now, the weapon only has a couple of controls. It has the trigger, it is the magazine release, and that’s it. But what you do have, right here on the left side of the frame, is this is the takedown pin, right here. This has to be pulled out. So, you don’t have to pull the trigger first or anything like that. You just have to work this pin off of the frame a little bit and get out from behind the frame. Now, in the owners manual, it shows people doing this with a piece of brass. I’m just going to use a small, flathead screwdriver, and I’m going to get right here, up under there, and I’m going to pull this pin out ever so slightly. Just until it protrudes past the frame a little bit. Then I’m going to take my fingers and I can pull the pin out. Okay. Here we go. Now, again, you don’t have to pull the trigger or anything. I can take the slide off of the frame. As you can see right there.
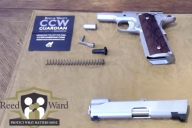
The next step is to disassemble the upper assembly or slide and that is this wrinkle spring in the barrel in here. Now, a lot of semiautomatic pistols I have done reviews of, I have told you it’s not under a great deal of pressure. This is a lightweight aluminum spring, a recoil guide, and two springs. It’s a dual spring system that is not captured. So I want to point the barrel towards me and the head of this guide rod away from me. This is under a tremendous amount of pressure. If you let this thing go, it’s going to take off and fly across the room. So be very careful at this point. Make sure you have a good grip on that spring and the guide rod before you take it off of the slide. All right. So, always where eye protection and point this away from you. If you look at this video on the Internet, don’t point this towards the computer screen. All right, so I pull this off and out, keeping it under control and as you can see this is a dual spring system. Small, large in a lightweight aluminum pin right there. Now I’m going to push the barrel slightly forward, up and out. And this is the Kel-Tec 3AT disassembled.
Let’s reassemble it will quickly. Okay, we’ll start again with the upper assembly, the slide. I’ll insert the barrel, pull back on it. Barrel’s in. Now I’m going to take the guide rod, and I’m going to put the small spring on it, making sure that it’s all the way up against the head.
Then I’m going to insert the small spring inside the large spring, making sure they don’t kink and making sure they compact all the way. Good. Now again, barrel muzzle towards me, and what you’re looking for is this little half-moon right here. This indentation on this barrel lug is where the head of the guide rod has to rest when it’s properly installed. So, springs and there’s a little hole, right here you can see, right now look at my finger the hole. See the hole right here? That’s where the guide rod has to fit. So, it’s a little tricky. Sometimes it takes a little bit, but what you got to do is make sure that the springs don’t bind against each other, don’t kink against each other as your installing it. And this sometimes takes a little bit, so, and it’s under a tremendous amount of pressure. So, make sure that it’s seated before you take your finger off of it because that thing will take off like a rocket. Okay, and that’s what it should look like. I’m going to give you some background right there. What it should look like, it should look level, not kink, not bound up in any way. All right. Make sure you can see that. Good.
Now we’re going to reinstall this slide assembly onto the frame. Now here are the guide rods and when you first stick it on, it’s going to pop, and it will pop right over that resistance. And it comes all the way back. Now, you have to look through the hole, right here, and pull it back. I’ll see if I can show this to you. Okay, see right there, the barrel is too far forward. Pull back. Now you see the hole and if you pull back past that, you see the other barrel coming into play. So, using your hand as a lever, as I’ve demonstrated in noter videos, pull back just slightly and insert that pin right through that gap and press it all the way down. The pin is now all the way down. If the pin won’t go in, there’s a small spring at the bottom of the hole. Kind of angle your pin with the head up, like this. Go in, press down on that spring, then rotate it up and stick it straight in.
The owner’s manual says do not dry fire. I think that you have to dry fire to make sure that the weapon functions properly before you put it up. But, as this is a more inexpensive weapon, I do not recommend extensive dry firing. Okay, so that is the Kel-Tec 3AT disassembly and reassembly video.
No Comments